How to Create and Assign Security Groups
Security groups control inbound and outbound traffic to your virtual machines, effectively acting as virtual firewalls. When you provision a new virtual machine, it’s automatically assigned the default security group, which allows all inbound and outbound traffic. For improved security (especially if your VM will be publicly accessible) it’s recommended to create and apply custom security groups with only the necessary ports open.
Creating a Security Group
1. Sign-in to your VHI dashboard.
2. Navigate to the Compute > Security groups section.
3. Click on + Create security group.
4. Specify a name and optional description for the security group and click Add.
5. Next to the Inbound section, click Add to start adding protocols. You can specify a protocol number, or choose from the existing list.
6. Specify a single port (or range) and allowed source IP subnet and click the checkmark button. In the example below, SSH is allowed from anywhere.
 To allow all access to a specific port, choose 0.0.0.0/0. To limit to a single IP address, enter the public IP address with a /32 at the end.
Assigning a Security Group
Once the security group has been created, it needs to be assigned to a virtual machine.
1. Navigate to the Compute > Virtual machines section.
2. Click on your virtual machine to bring out a fly-out pane.
3. Go to the Network interfaces section and click on Edit.
4. Click on the ... beside the network interface and click Edit.
5. Click on Security groups to bring up a drop-down menu of your existing security groups.
6. Select the newly created security group, and deselect "default".
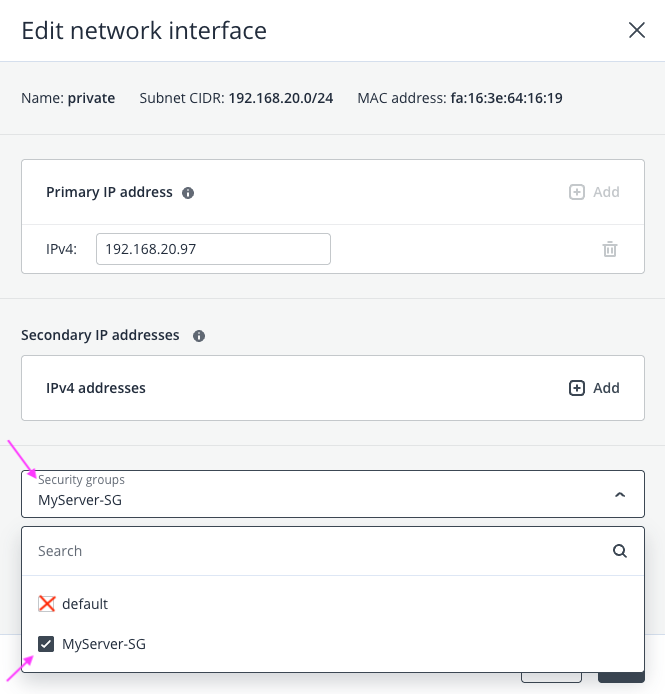
7. Click on Save, and Done to apply the changes. The security group will immediately take effect.
Related Articles
How to Create and Manage Virtual Private Networks
Create a virtual private network A private network is ideal when managing multiple servers that require internal communication—such as database, application, and web servers—without exposing them to the public Internet. This setup enhances security ...How to Deploy a Windows Virtual Machine
1. Sign-in to your VHI dashboard. 2. Navigate to the Compute > Virtual machines section. 3. Click on + Create virtual machine. 4. Supply a name for the machine. 5. Next to Image, click Specify to choose a Windows image from the selection page ...How to Create Volume Snapshots
Snapshots are useful when performing system updates. If an update goes awry, you can choose to revert the snapshot to a previous point in time. Please refer to the steps below on the instructions for creating a volume snapshot. Note that if the ...